The remotely accessible SLS and SwissFEL data services include an offline high performance computing facility (Ra cluster) for data analysis and a large volume data transfer facility. A general overview of these services is provided here: https://www.psi.ch/photon-science-data-services/photon-science-data-services
To use any of the remote data services, a personal external PSI account (e.g.: "ext-meier_f") is required. Please read the Getting Started Guide and follow the instruction on how to request such account, if you do not already have one.
Note that as of June, 2023, PSI requires multi-factor-authorization (MFA) to connect to PSI resources remotely. The changes apply both to the remote access to the Ra cluster as well as for remote data transfer. This means that you need to request activation of your ext-account for MFA:
- Request MFA activation from PSI IT. In order to request MFA activation, you must send an email to the IT Servicedesk using helpmfa@psi.ch. Provide them with your external account name (e.g.: "ext-meier_f") and sent them a copy of a photo ID for verification purposes.
- Set up MFA for your account. Information on how to set up MFA for your account once it has been activated by PSI IT can be found here:
https://www.psi.ch/en/computing/change-to-mfa
The Ra cluster
The purpose of this service is to offer to external users access to high performance computing resources for analysis of large data volumes acquired at PSI large scale facilities. Common software is available but dedicated analysis algorithms must be provided by the users.
The general capabilities and configuration of the Ra data analysis cluster are described in more detail here, including instructions on how to connect to Ra and how to enable and use different software packages.
More details are available on the PSI intranet (only available with a connection from within PSI or through the remote access servers): https://intranet.psi.ch/Computing/Offline-computing-facility-for-sls-and-swissfel-data-analysis
Ra mailing list
To stay informed about operational issues, scheduled maintenance and downtimes as well as trouble shooting progress, we strongly recommend that all users of the remote access services subscribe to the Ra mailing list, as described also here. Typically, only a few emails are sent out per year.
Configuring remote access to the Ra cluster
To set up your remote connection to PSI, few initial steps are necessary. These include configurations to be performed at the PSI end by beamlime staff and installation of the necessary software on the end-user side. Please refer to the Remote Interactive Access Guide for instructions and follow all steps carefully. Make sure to test your connection before continuing to the TOMCAT-specific procedures below.
Access permissions to experimental data on and from Ra
Access to the experimental data for a specific experiment (more precisely, a specific eAccount) needs to be granted to each personal user account individually. Currently, while the Ra cluster is still in the testing phase, this access needs to be configured by one of the beamline staff. Let them know your personal account name (e.g.: "ext-meier_f"), and which eAccount or proposal number you need to access.
In the near future, the granting of access rights will be delegated to the experiment's PI. Access rights will then be configured through the DUO without requiring intervention from the beamline staff.
Data locations on Ra
In contrast to using the compute cluster at the beamline during the beamtime, the location of your data is a bit more confusing when using the Ra cluster. The Ra cluster provides direct access to your experimental data acquired during the beamtime ("online"). However, this is a read-only mount of the high-performance online beamline file system. Thus, this prevents you from accidentally deleting data, but also from modifying and adding directly to the original data sets. Instead, a separate file system ("offline") attached to the Ra cluster is used as a work area. In terms of running the reconstruction scripts or other analysis tools, this means that you are reading the raw data from one location, but saving results to another location.
You should be able to see your original experimental data under the following path (online file system):
/sls/X02DA/Data10/$EACCOUNT/
Where $EACCOUNT is the eAccount name (e.g.: e12345) used for data acquisition during the beamtime.
Any output from your analysis should go into the following location (or subfolders thereof):
/das/work/$PNN/$PGROUP
Here, $PGROUP represents the PI-Group associated with the proposal or beamtime (e.g.: p12345), and $PNN are the first three characters of the PI-Group (e.g.: p12). The numerical part of the PI-Group is always the same as for the eAccount.
Some more in-depth information about the data locations and file systems can be found in the Data Section of the central documentation pages.
The procedure to reconstruct "standard" TOMCAT tomography data on Ra is essentially identical to running the reconstructions at the beamline during your experimental campaign. Follow these steps and instructions to get started.
Using the Fiji Reconstruction Manager
- Open the Fiji software: From the start menu (the Egyptian eye symbol in the lower left corner of the screen) select TOMCAT > Fiji (TOMCAT)
- In Fiji, open the Reco manager plugin: Plugins > TOMCAT > Reco Manager (latest, etc)
- Click "Select a Dataset" and navigate to the location of the raw data (usually in the read-only eAccount, see above for details on the file locations for your data).
- Proceed with the reconstruction just like you did when using the same interface at the beamline.
- The results of the reconstruction will be automatically saved in the pGroup directory associated with the eAccount to which the raw data belongs.
Checking the status of the cluster queue
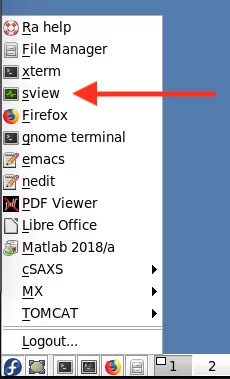
The cluster job scheduling system used on Ra is SLURM. The easiest way to check the status of the cluster queues is by using the Sview program. Launch the program by selecting the sview entry in the Ra start menu in the lower left corner:
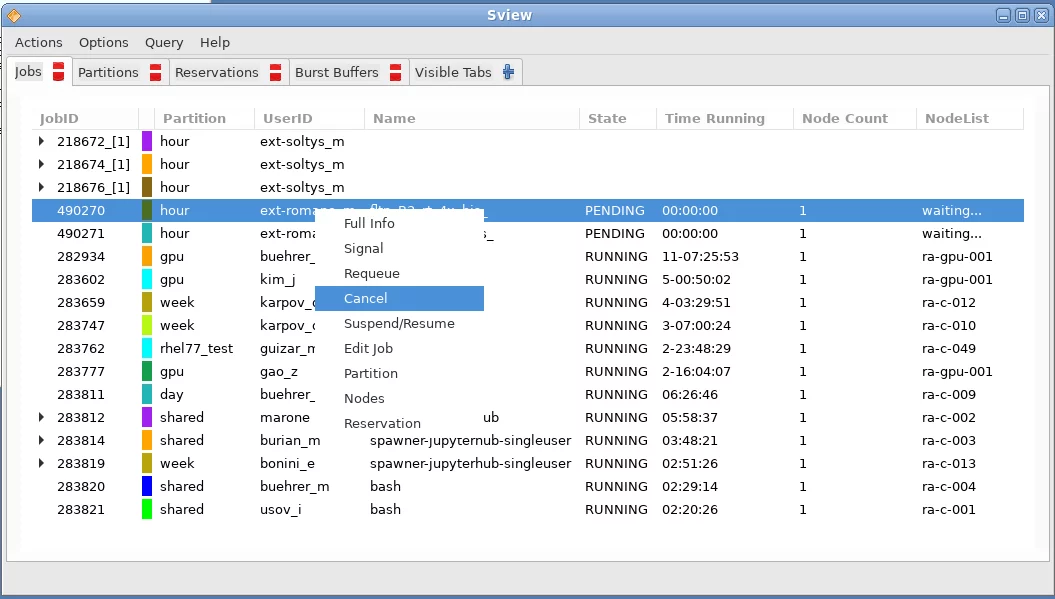
The Sview program will list all running jobs in all queues. Through the menu, you can filter this list to only show a particular set of jobs, for example, just those that were launched by yourself. Right clicking on a job opens a context menu from which you are able to pause or cancel a job, etc.
As an alternative to the Sview GUI, you can use the following commands in a terminal to monitor the queue and manipulate individual jobs:
See the currently scheduled, running, and possibly stuck jobs in the queue:
squeueThis gives you the full list of all currently running and scheduled jobs by all users. To restrict the list to your own jobs, specify the user argument (-u). Additionally, you can use the watch command to automatically update the display every few seconds:
Delete a job from the queue:
scancel <Job-ID>where <Job-ID> is the number shown when calling the squeue command. For example:
Note that depending on how many users are using the cluster, it can happen that your reconstruction jobs are stuck in the queue for some time before they are being executed. Remember that this is a shared resource.
Disk space on Ra
The disk space you have available on your work are on Ra (i.e., under /das/work/$PNN/$PGROUP/) is currently limited to 4TB. As soon as you go over that limit, you will not be able to run any more reconstructions. In this case, you should transfer the already calculated results to a storage location at your institution to make room for further calculations. Also, you can run a cleanup script every once in a while which will delete all of the unnecessary temporary data. Navigate to the folder which you want to clean (including all subfolders!) and then run the following command:
For example, to clean up any temporary data files in the Data10/disk1 folder in your work area, including all of its sub-folders in the cleanup, do this:
You can see your currently available quota by calling the following command:
/das/support/users/space_usage/pgroup_info p12345You will then see an output similar to the one below:
Name: p12345 Unit: TOMCAT Kind: external Used: 1.2 GB Members: ext-meier_t,muster_f Quota: 4 TBIn case you really require more disk space for your data analysis, you should contact your local support staff and request a quota increase. An extension of the quota can be granted for a limited period of time (usually 3 months) before the quota is automatically set back to its original value. Please specify and justify both the total amount of storage space you need as well as the duration for the requested extension.
Common reconstruction problems and some solutions
Fiji does not display images anymore
When working on the Ra cluster, from time to time it happens that Fiji is not displaying any images anymore, but instead presents the user with a gray window where the image should be. In this case, please try to restart Fiji. In very rare cases, it might also be necessary to completely log out of your Ra session (using the "Logout..." command from the main desktop menu in the lower left corner of the screen) and to reconnect to it.
Wrong center of rotation
For most data sets, the reconstruction software should automatically detect the appropriate location of the rotation center for the reconstruction. However, occasionally this automatic determination fails, and phase reconstructions are particularly prone to this problem, but also data sets with an inherently low image contrast.
A wrong value for the rotation center has usually a quite obvious effect on the reconstructed image in that is produces "half-moon" or "C"-shaped features, pointing either to the left or to the right of the image throughout the whole image plane, as shown in the image below.
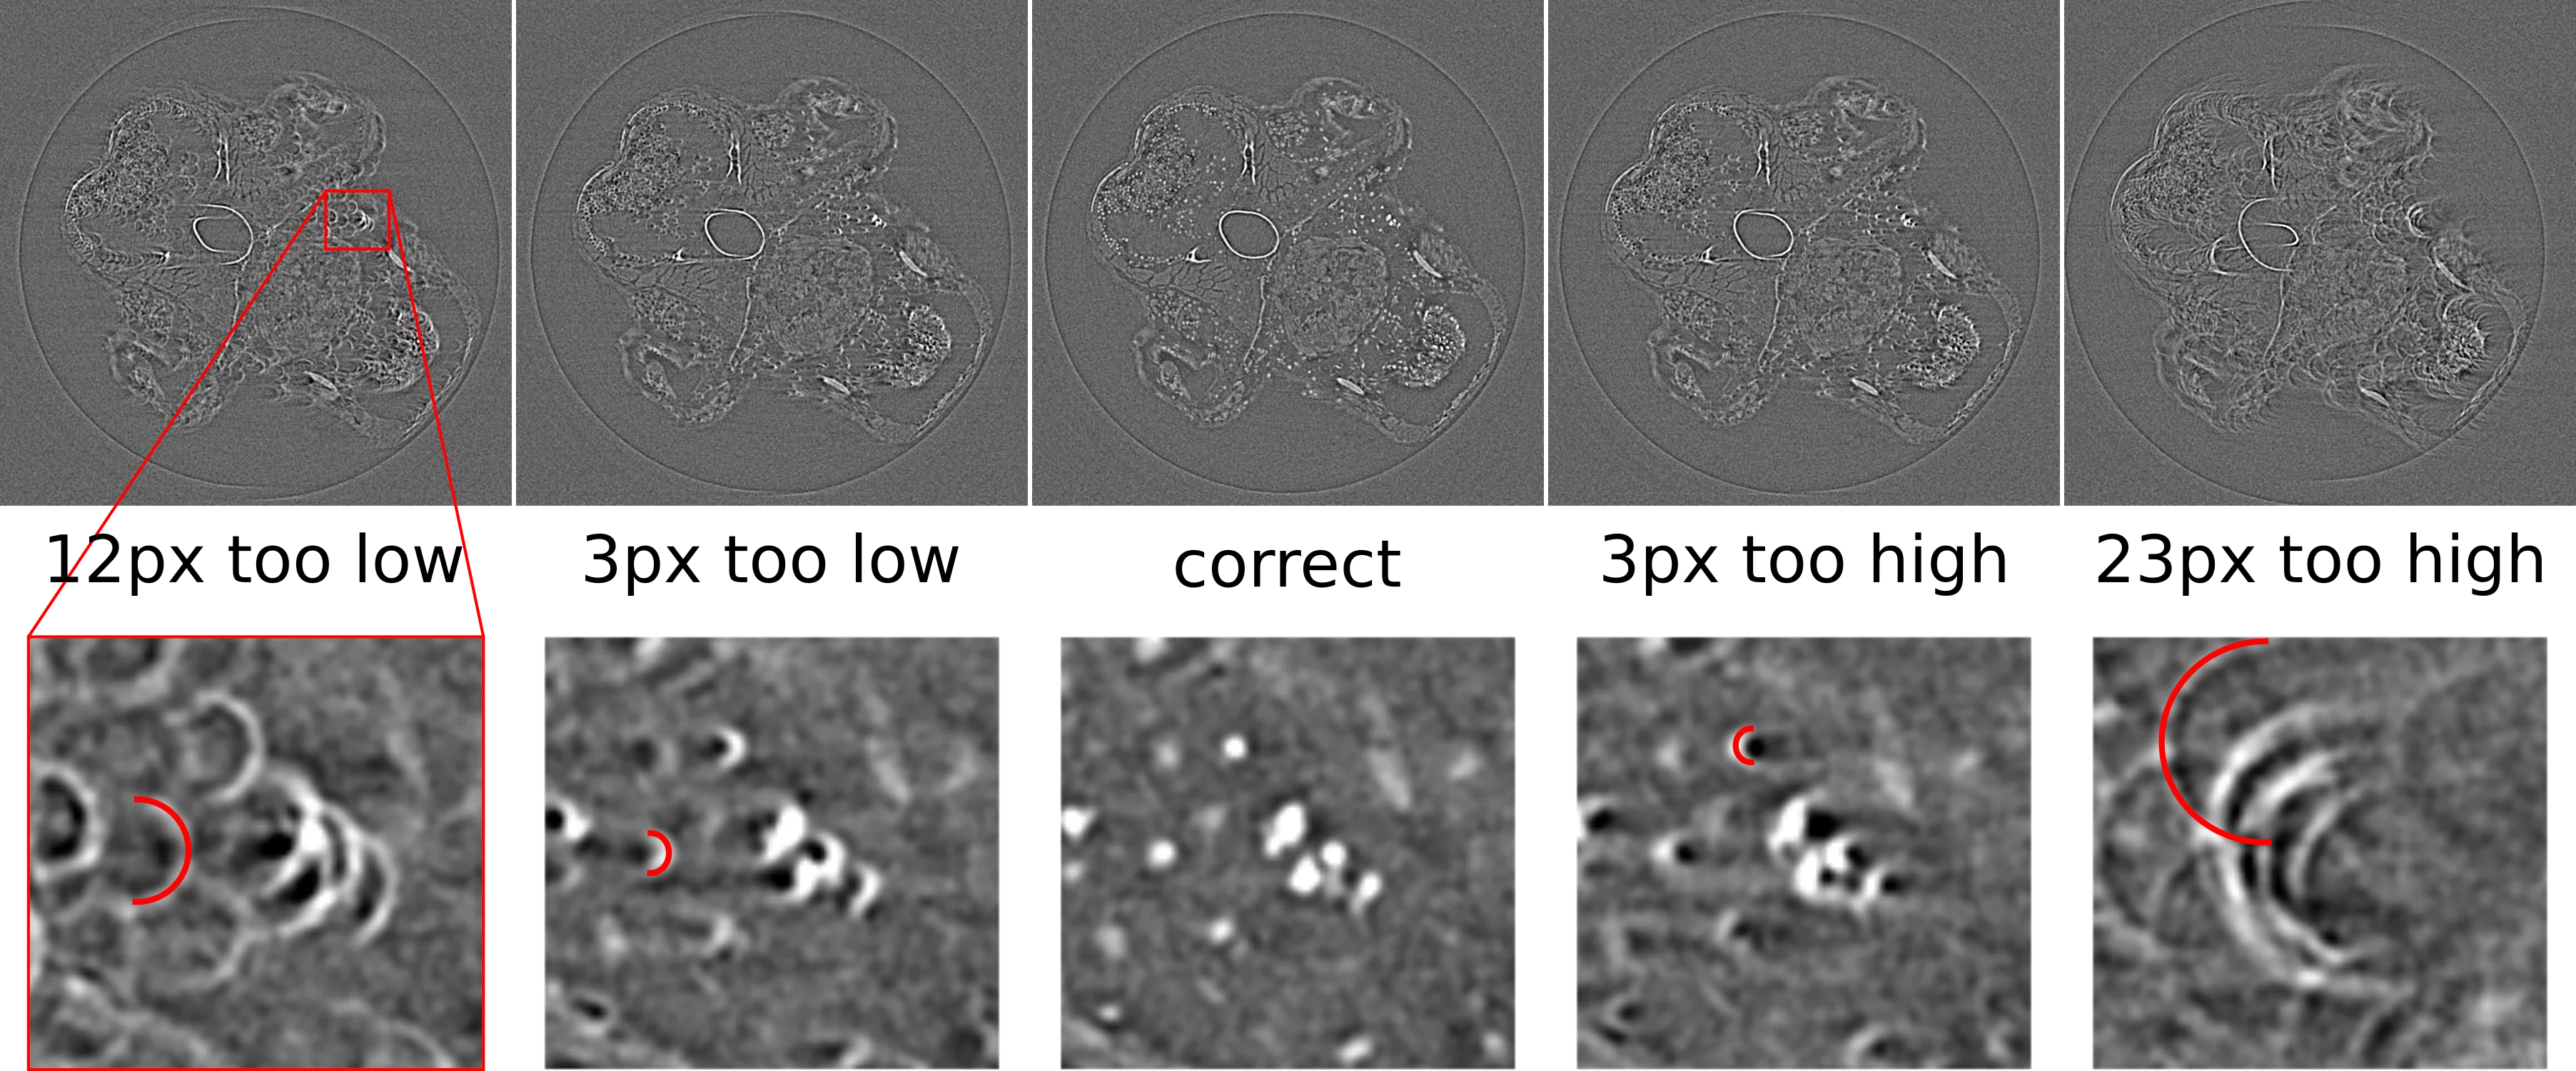
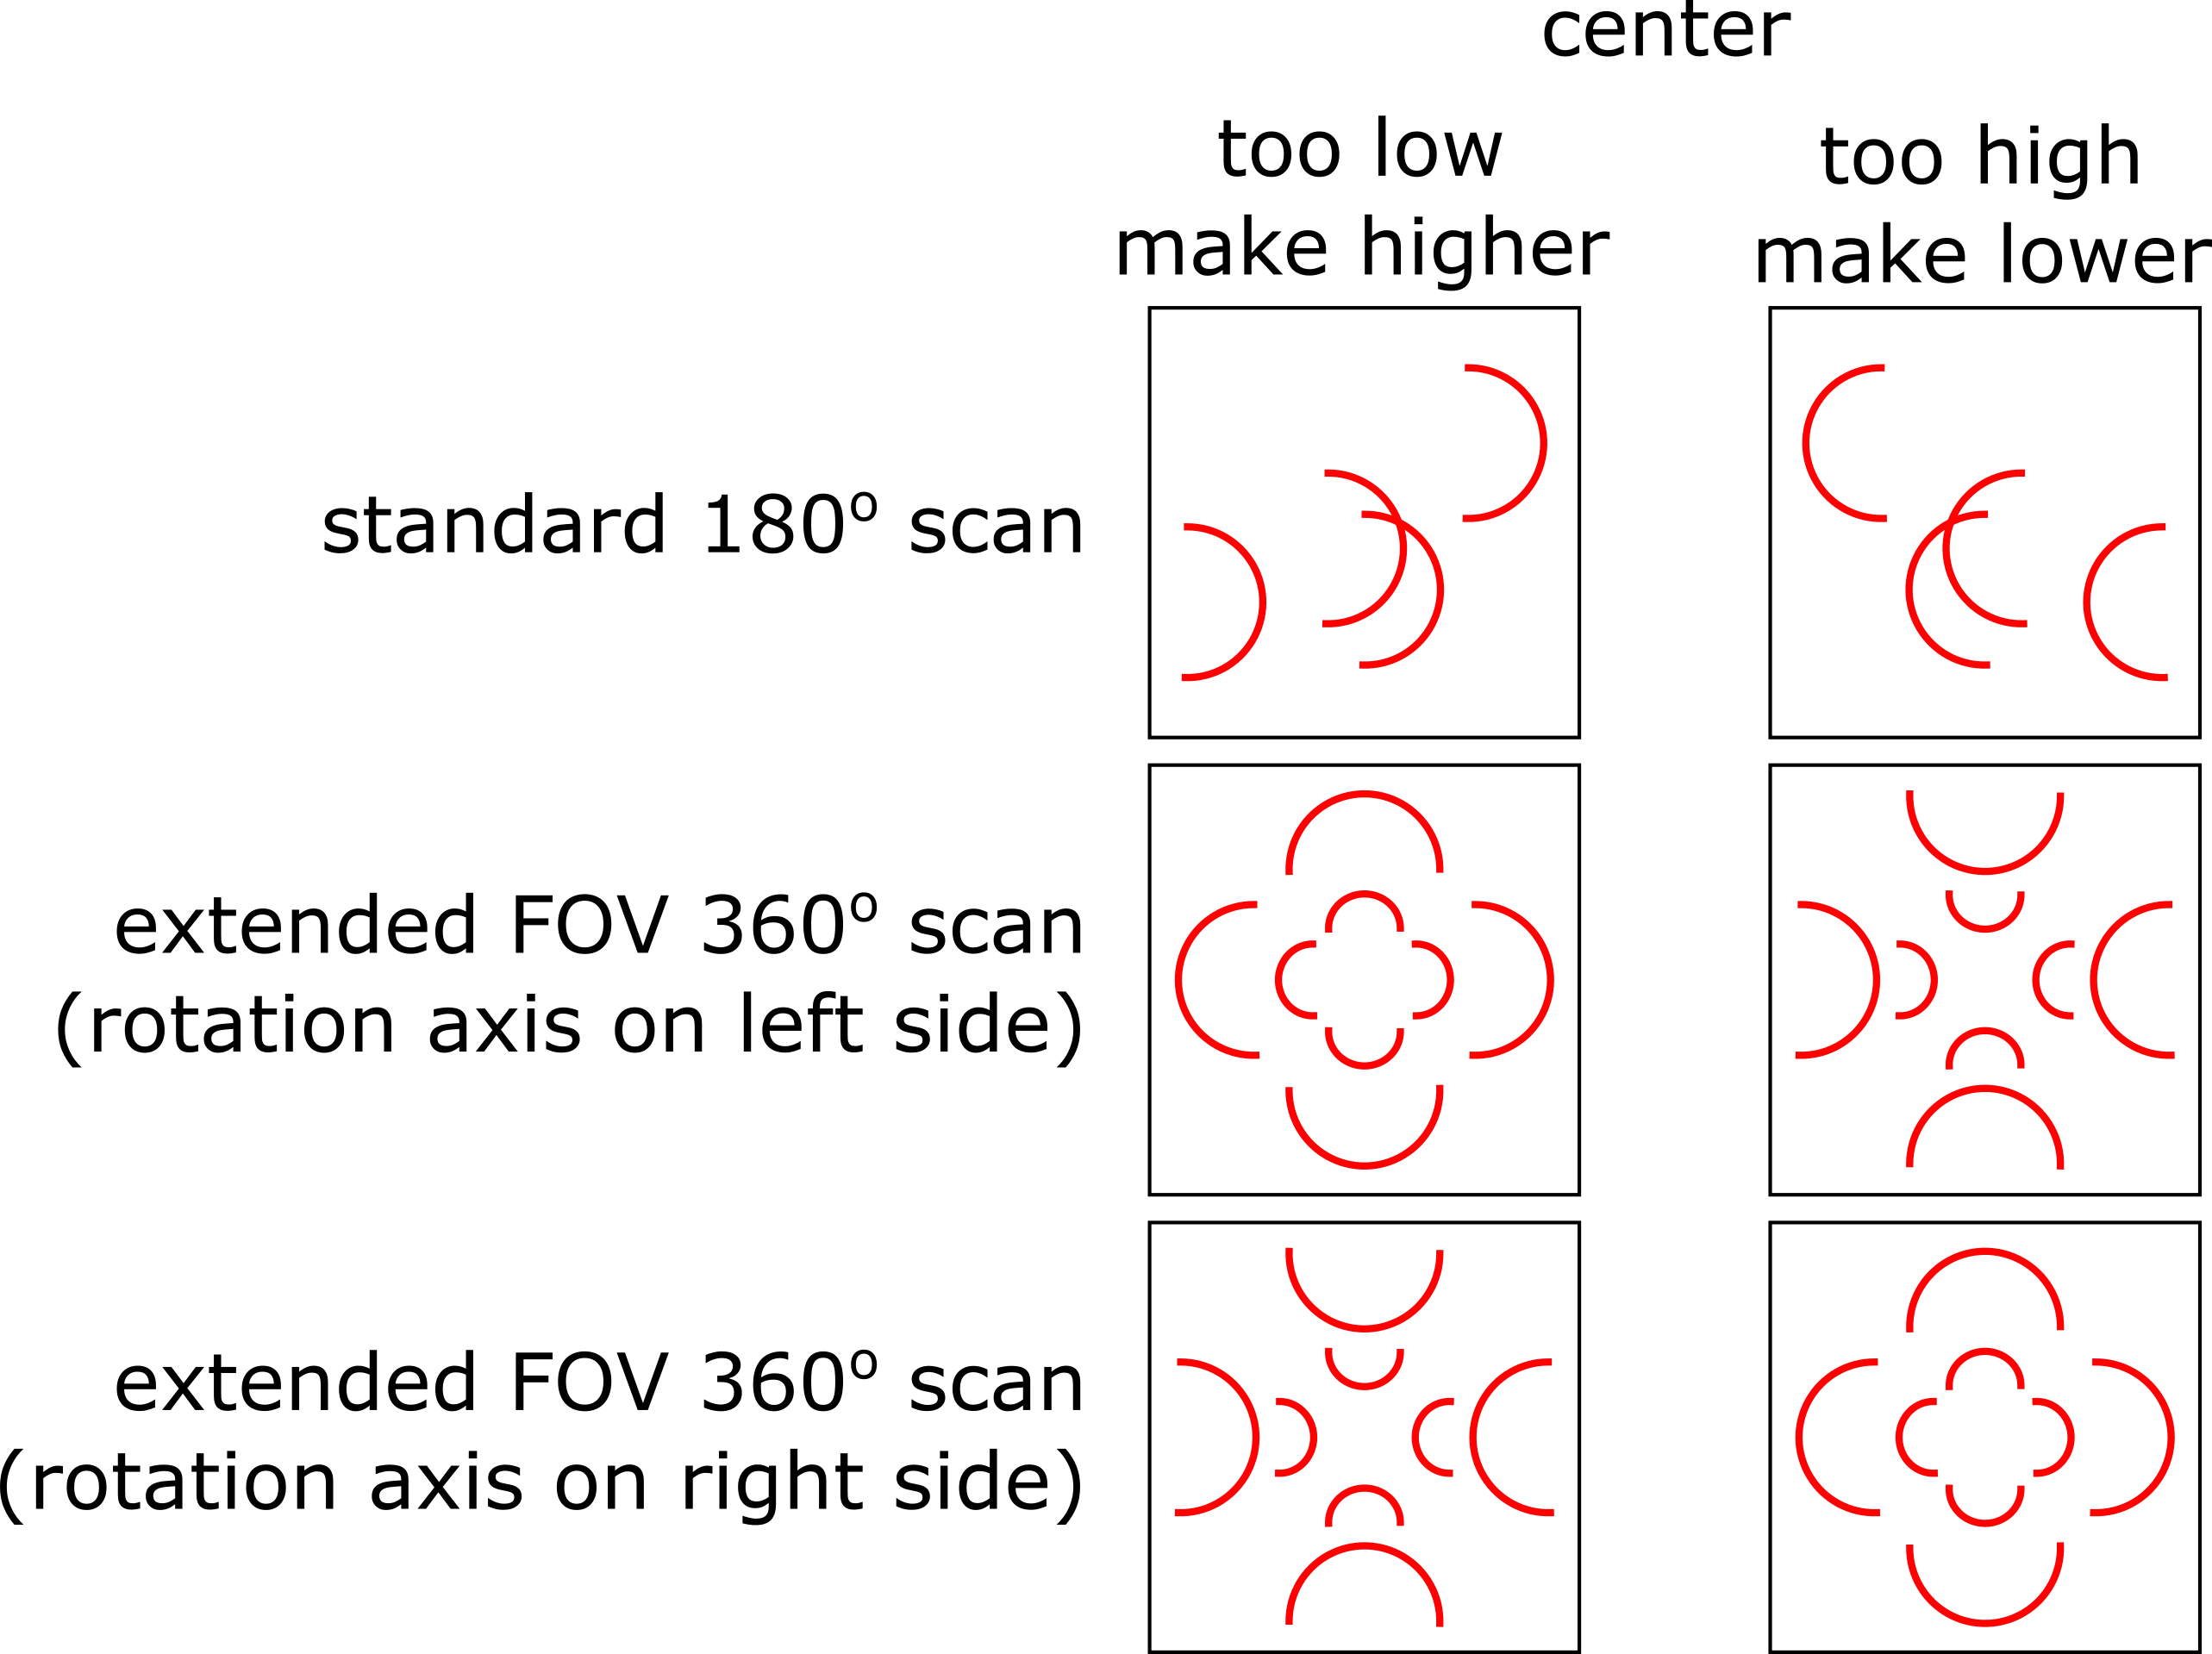
These artefacts can be fixed by manually adjusting the value used for the rotation center. The direction of the half-circle features indicates whether the center needs to be made higher or lower, as shown in the graphic below. The required change in the center value with respect to the current value is equal to the radius of the half-circle feature detected in the image.
Setting the minimun and maximum intensity values for the reconstruction
The reconstructed images diplayed by the reconstruction manager are 32-bit floating point numbers. These are almost always converted to 8 or 16 bit integer value tif files for the final reconstructed data sets. However, the conversion from floating point to integer numbers needs to be explicitly specified. That is, we need to determine which floating point number corresponds to a value of 0 in the final data sets (lowest intensity value or lower histogram edge), and which float corresponds to a value of 255 or 65535 for 8-bit and 16-bit data, respectively (highest intensity value or upper histogram edge). Running a histogram command on the reconstructed slice (Ctrl-h in Fiji) can help to determine a sensible set of values. Make sure you test these values on a few different slices at different heights through the sample to make sure the values are valid for the whole 3D data set.
Python Error when reconstructing: "RuntimeError: Bad magic number in .pyc file"
The cause for this error is usually that a local conda installation in your account is interfering with the python installation of the pipleline. Make sure that any locally installed conda instances DO NOT activate themselves automatically at login, but rather activate them only as needed. Run the reconstruction pipeline from a terminal in which the local conda environment has not been activated.
"ImportError: No module named h5py" when running reconstructions via the script
The h5py library cannot be found, most likely because the TOMCAT python environment has not yet been activated in the terminal where you are running the reconstruction script. Make sure to activate the TOMCAT conda environment prior to using the reconstruction script (see below: https://www.psi.ch/de/sls/tomcat/computing-infrastructure#configuring-python).
Available software
The following software packages relevant for tomography data analysis are currently available on the Ra cluster:
- TOMCAT reconstruction pipeline: The pipeline is available via the reconstruction manager GUI from Fiji (see Fiji below). Simply open Fiji and go to Plugins > TOMCAT > RecoManagerRA. This should open the GUI.
- Python (anaconda, python 3.8): See Configure Anaconda Python
- Matlab (multiple versions): Use
module load matlab/2016aat the command line to activate the 2016a version of Matlab:module load matlab/2016a matlab & - Compilers: Various common compilers
- Fiji: The full Fiji installation including our custom DMP and hdf5-file plugins is available from the launcher, if working with a NX session and remote graphical user interface. Just open the start menu > TOMCAT > Fiji. From the command line, issue the following command instead:/sls/X02DA/bin/fiji &
- ParaView:module use unstable module add paraview vglrun paraview See https://intranet.psi.ch/Computing/DaasScientificApplications on the PSI intranet for more details on how to use and run ParaView.
- Mathematica:module use unstable module add mathematica mathematica &
See https://intranet.psi.ch/Computing/DaasScientificApplications on the PSI intranet for more details.
To see a full list of all available modules, type the following command in a terminal shell:
module use unstable module avail
More general information about installed software can be found here: https://www.psi.ch/photon-science-data-services/offline-computing-facility-for-sls-and-swissfel-data-analysis#Software
If you require any other software packages for your data analysis that are currently not available on the cluster, please contact us. We will check with our IT support to see if the missing software can be installed/provided (subject to availability, compatibility, and licensing restrictions).
Configuring Python
All TOMCAT-specific scripts and tools written in python were built and tested in conda environments for Python 3.8. In order to use our tools, one first needs to activate the correct conda environment. Type the following command in a shell to activate the TOMCAT python environment:
source /sls/X02DA/applications/py_envs/tomcat_daq/activate_py38.sh
Note that you need to run all commands that ought to make use of this environment from that same terminal where you activated the environment. When opening an new shell, you always need to run the above command again to activate the environment for that session.
Several options are available to transfer data to and from PSI file systems. General instructions on how to set up and use the file transfer facility are described here: https://www.psi.ch/photon-science-data-services/slsswissfel-data-transfer
Transferring data from Ra to your home institution using ssh/rsync
Please consult the general information about ssh/rsync transfer.
Transferring data from a remote location back to Ra using ssh/rsync
Before transferring data back to the Ra cluster, please refer to the general info about data transfer (also mentioned above)
The exact procedure to upload the data is described under upload data.
Transferring data using the Globus Online application
Follow the instructions about setting up and using Globus Online for data transfer from PSI here.
Your TOMCAT data should be accessible when using the PSI endpoint and selecting the following paths:
/~/sls/X02DA/Data10/$EACCOUNT/ /~/das/work/$PNN/$PGROUP/
where $EACCOUNT is the eAccount name (e.g.: e12345) used for data acquisition during the beamtime, and $PGROUP represents the PI-Group (e.g.: p12345) and $PNN are the first three characters of the PI-Group (e.g.: p12).
Archiving data
The raw data (projection images, log files) from your beamtime will be archived to the PSI Petabyte tape archive by your local contact according to the PSI data policy. If you also want to archive reconstructed data, please get in contact with your local contact to discuss the available options and workflows (which are still under development).
Retrieving data from the archive
Datasets from the archive can be retrieved by any user with a valid external PSI account that has access to the corresponding p-group.
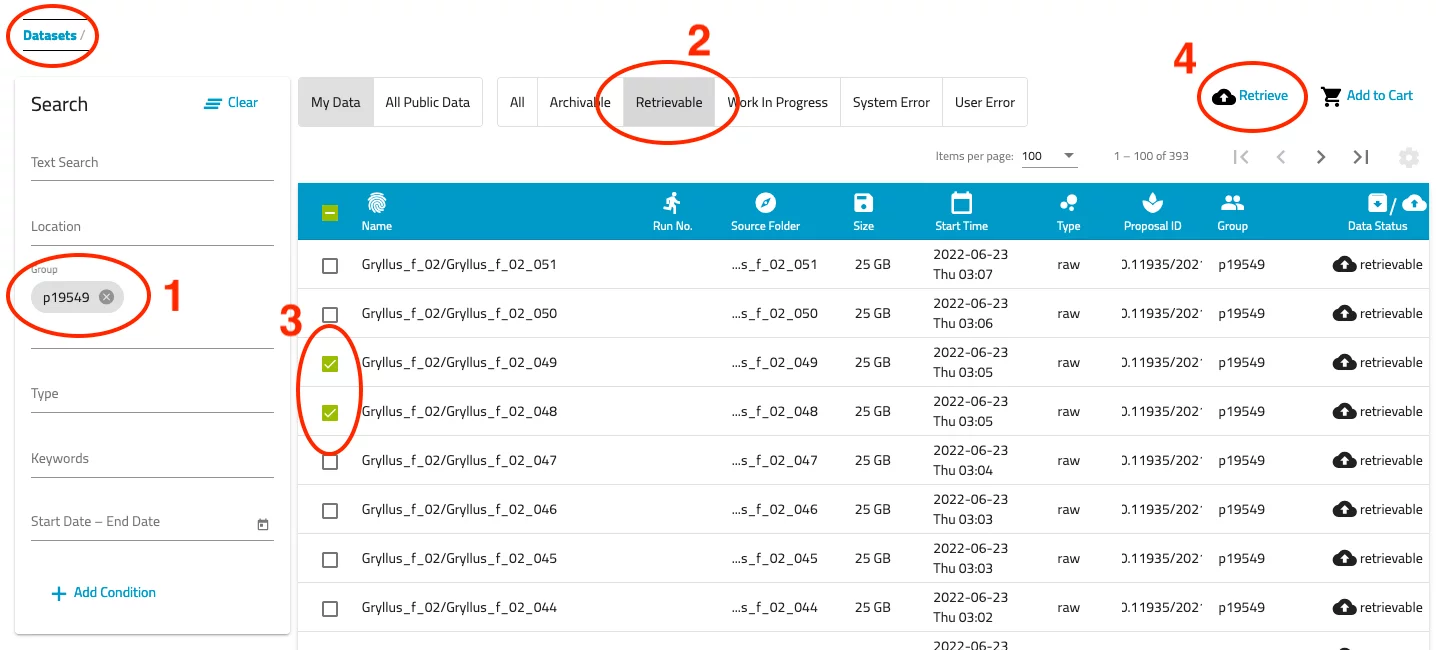
There are several methods to retrieve the data. The easiest to use is the following procedure (see also the following screen shots):
- Log in to discovery.psi.ch with your external PSI account
- Accept the updated terms, if necessary
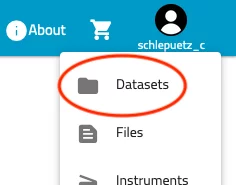
- Locate the profile badge at the top right corner of the page, click it and select "Datasets"
- Now you should be presented a list of datasets you have access to. Use the filter options on the left side to narrow down the list. Note that the text search does not work very well...
- Select the "Retrievable" filter above the list of datasets. Now only those data sets are displayed which can be retrieved from the archive.
- Select all of the datasets you want to retrieve by checking the corresponding selection box.
- Push the "Retrieve" link at the top right of the dataset list.
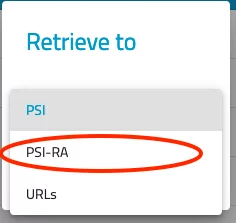
- In the pop up dialog "Retrieve to", select the option "PSI-Ra". This will directly transfer your datasets into the "retrieved" folder inside your p-group directory (e.g.: /das/work/p12/p12345/retrieve).
- You will be notified by email once the transfer is complete.

