PSI employees with an account can use the system as standard. Non-PSI employees must apply for an account for external users via their responsible contact person.
The system is only available as a tunnelling/proxy system. This means that after successfully logging into the system, there is NO active, usable shell available that can be used for a further connection to the PSI Lan.
A ‘setup-connection’ to hopx.psi.ch must be established at the start of use. This connection sets up access for the user on hopx.psi.ch. It must be interactive and kept open. Without this ‘setup-connection’, no connections to PSI-Lan are possible via hopx.psi.ch!
- Only one active ‘setup-connection’ to
hopx.psi.chis possible per user. (further information can be found below) - the ‘setup-connection’ can be combined with one or more port forwarding (see below)
- SSH clients (Putty, OpenSSH etc.) can be configured so that SSH connections to the PSI LAN are made via the ‘setup-connection’. (Keyword: SSH multiplexing, ProxyJump, Connection Sharing)
Note on OpenSSH:
The command
ssh -J <user>@hopx.psi.ch <user>@example-ssh-srv.psi.ch
does not work without a prior ‘setup-connection’, even if this is usually possible with OpenSSH!!!!
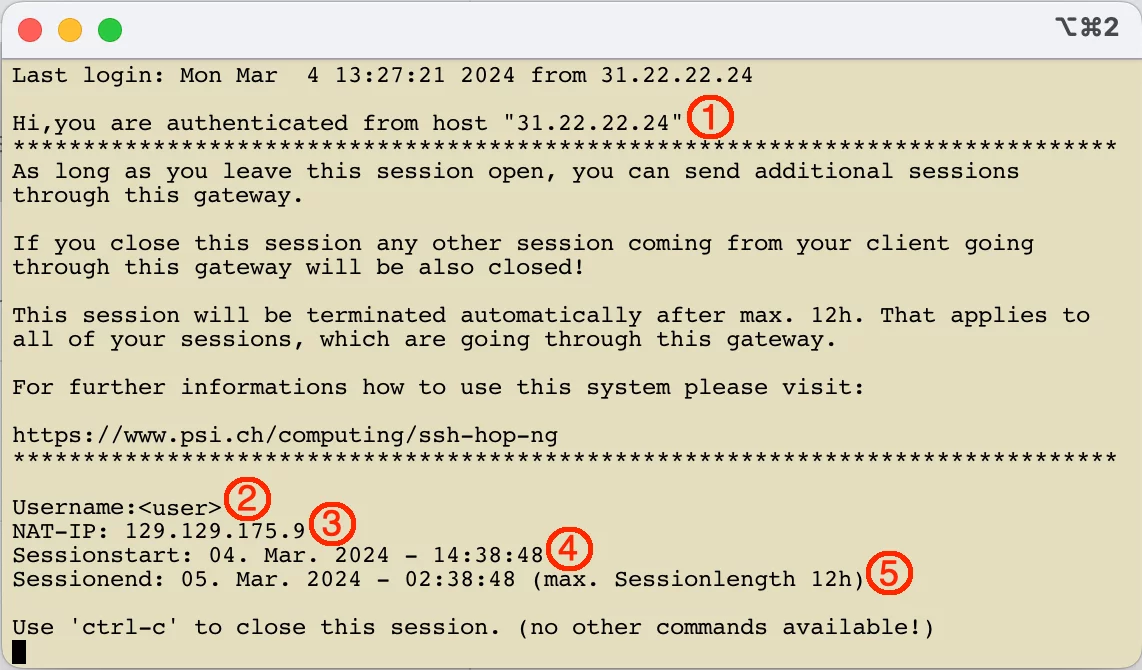
The following illustration shows the output after successful login.
The output after the login contains the following important information:
- The IP address of the client which established the connection to
hopx.psi.ch. - The user name which is used for the connection.
- The NAT IP address, which will be used for the connections established by the user through
hopx.psi.chto systems within the PSI network. - The date and time when the connection to
hopx.psi.chwas started - The maximum date and time until which the connection to
hopx.psi.chcan be held open. At this time (if the maximum session duration of 12 hours has expired) the connection tohopx.psi.chis automatically terminated. All connections to the PSI network going throughhopx.psi.chwill also be disconnected.
The connection to hopx.psi.ch can be terminated with ‘ctrl-c’. No further commands are available!
********* Attention ****************
If the ‘setup-connection’ to hopx.psi.ch is terminated while the connection(s) to an internal system are still active/open, these will also be terminated!!!
*********************************
Behaviour when establishing more than one ‘setup-connection’
If a second ‘setup-connection’ is established to hopx.psi.ch using the same user name and the same source IP address, this connection will be terminated after successful authentication with a reference to the existing connection.
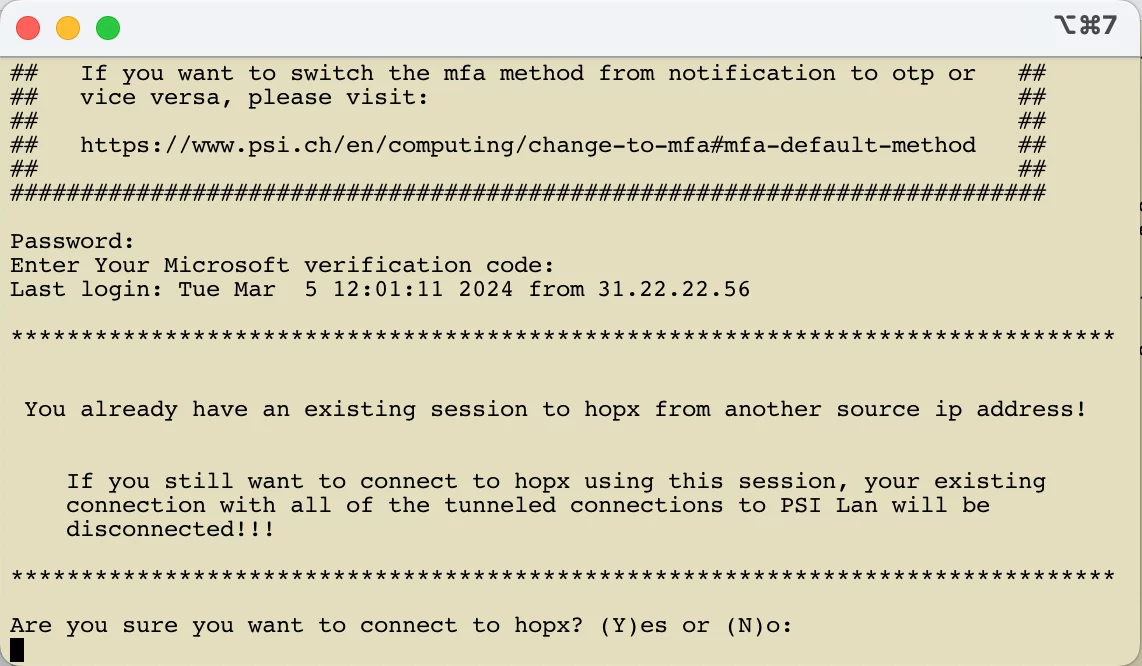
If a second ‘setup-connection’ is established to hopx.psi.ch using the same user name but a different source IP address to the existing connection, the user is given a choice after successful authentication. He can actually establish the second connection, but then the first connection and all associated tunnelled connections to the PSI network will be disconnected. Or he can terminate the second connection and continue working with the first. The answer to the question must be ‘Y’, ‘y’, ‘N’ or ‘n’.
Maximum session duration of 12 hours
The duration of the active connection to hopx.psi.ch is limited to a maximum of 12 hours, similar to VPN access. The maximum time until which the connection can remain active is displayed after an successful authentication (see above). In the same window, five minutes before the connection is terminated, a message is displayed indicating that the connection is about to be terminated.
********* Attention ****************
If the connection to hopx.psi.ch is terminated while the connection(s) to an internal system are still active/open, then all other connections will also be terminated when the connection to hopx.psi.ch is terminated!!!!
***********************************
Note on the possible tunnel connections
Please note that not all users of the system have the same access rights. Depending on the type of the user account, different connections are possible via the system.
PSI employees
PSI employees can tunnel the following TCP connection to the PSI LAN via hopx.psi.ch:
| TCP port number | is used by |
|---|---|
| 22 | SSH |
| 80/443 | HTTP(S) |
| 445 | Windows File Server (z. B. fs00, fs01 or fs02) |
| >1023 | e.g. für RDP, VNC etc. |
External users
External users can tunnel the following TCP connection to the PSI LAN via hopx.psi.ch:
- SSH connections to the
Merlin,RA,Login,MEGetc. clusters. - SSH connections to the experiment jump systems etc.
These SSH connections are only possible if you have the appropriate access rights. If you do not have these rights, please get in touch with your responsible PSI contact person.
If you require further connection options, these must be requested for you by your PSI contact person.
The previously generally valid access options for external users such as
| TCP port number | is used by |
|---|---|
| 22 | SSH |
| 3389 | RDP |
| 5900 | VNC |
will be gradually deactivated during the next weeks.
Note on the use of VS Code
The remote SSH plugin of VS Code tries to re-establish an interrupted SSH connection several times due to the default settings. If a user was connected to several systems remotely via SSH and the connections were interrupted, VS Code tries to re-establish each connection automatically. This behavior can lead to many failed login attempts on hopx.psi.ch and in extreme cases to an automated blocking of the user account or the client IP address.
To prevent this, the number of automated connection attempts in the VS code must be significantly reduced.
To do this, "Max Reconnection Attempts" must be set to 0:
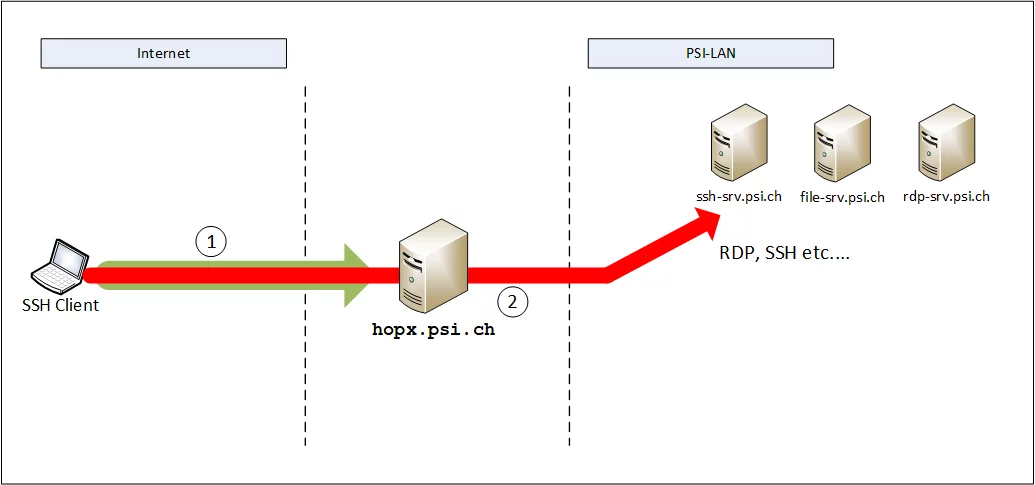
SSH, RDP etc. to internal systems with the help of port forwarding
Recommended for users who want to quickly establish an RDP or SSH connection to a system in the PSI LAN.
Use case:
- Forwarding of one or more ports via
hopx.psi.chto an internal system for the use of RDP, SSH etc.
Advantage:
- fast access to an internal system, as it is not necessary to set up SSH multiplexing
- only one connection (setup-connection, see basics above) with simultaneous port forwarding to
hopx.psi.chrequired
Disadvantage:
- If there is already a connection to
hopx.psi.chand you want to forward another local port, the connection tohopx.psi.chmust first be terminated and re-established.
Procedure:
- Establish the setup-connection with port forwarding to
hopx.psi.ch - Use port forwarding
(Note: ssh-srv.psi.ch + rdp-srv.psi.ch are not real systems, merely placeholders and serve as examples. These host names must be replaced by the host name of the system you know!)
Example: Step no. 1, establish setup-connection to hopx.psi.ch with port forwarding
$ ssh -L 8000:rdp-srv.psi.ch:3389 <user>@hopx.psi.ch
tunnels, e. g. the local port 8000 to port 3389 (RDP) of the RDP server rdp-srv.psi.ch
or in the case of a multiple port forwarding
$ ssh -L 8000:rdp-srv.psi.ch:3389 -L 8222:ssh-srv.psi.ch:22 <user>@hopx.psi.ch
the local port 8222 is also tunneled to port 22 of ssh-srv.psi.ch, which can then be used to establish an SSH connection to the system.
Example: Step no. 2, use port forwarding
If the connection to hopx.psi.ch exists, the connection to the internal systems can then be established via the locally forwarded ports. For example, with
connect an RDP client to
"localhost:8000" or to “127.0.0.1:8000” (for a connection to rdp-srv.psi.ch)
and/or with the SSH client
$ ssh -p 8222 <user>@localhost or $ ssh -p 8222 <user>@127.0.0.1
for a connection as <user> to ssh-srv.psi.ch
SSH to one or more internal systems using "ProxyJump"
Recommended for users who regularly want to establish an SSH connection to several internal systems
Use case:
- Establishing one or more SSH connections via
hopx.psi.chto internal systems.
Advantage:
- no port forwarding to the internal systems necessary
- flexible establishment of one or more SSH connections to internal systems, as no adaptation of port forwarding is necessary
Disadvantage:
- setup-connection (see basics above) to
hopx.psi.chmust be set up separately from the other SSH connections. - without previously activated SSH multiplexing, authentication to
hopx.psi.chis required for each connection (setup-connection and connections to internal systems)
Note:
For this variant, it is recommended to activate SSH multiplexing on the client system. With a active SSH multiplexing, you do not have to authenticate yourself again for connections (see below; example: step no. 2) via hopx.psi.ch.
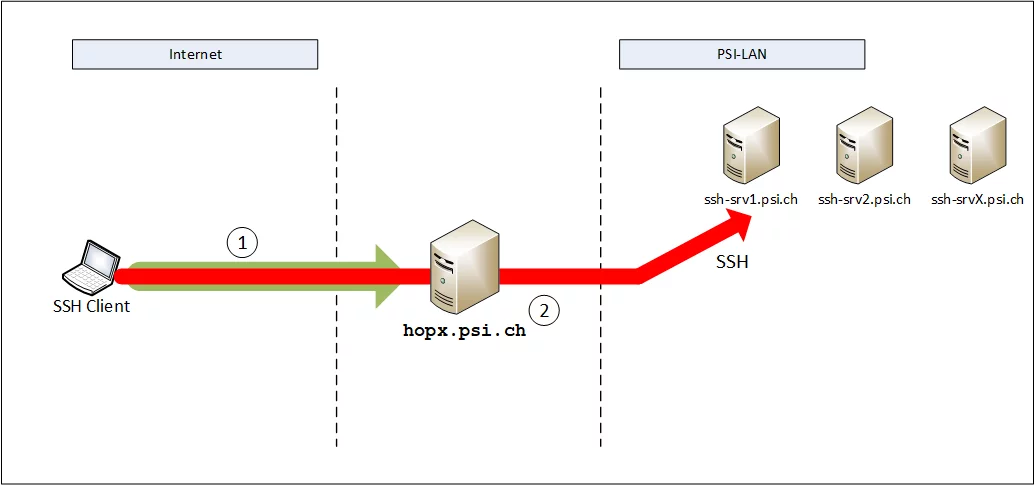
Procedure:
- establish setup-connection (see basics above) to
hopx.psi.ch - establish SSH connection via
hopx.psi.chto the internal system
(Note: ssh-srv1.psi.ch, ssh-srv2.psi.ch etc. are not real systems, merely placeholders and serve as examples. These host names must be replaced by the host name of the system you know!)
Example: Step no. 1, establish setup-connection to hopx.psi.ch and leave it open:
$ ssh <user>@hopx.psi.ch
Then it is recommended to open a new terminal and start the SSH connection for step no. 2
Example: Step no. 2, establish SSH connection via hopx.psi.ch to the internal system ssh-srv1.psi.ch
$ ssh -J <user>@hopx.psi.ch <user>@ssh-srv1.psi.ch
The option "-J <user>@hopx.psi.ch" informs the SSH client that the connection to the server "ssh-srv1.psi.ch" should be established via the existing connection from step no. 1 to hopx.psi.ch (without active SSH multiplexing, you will be asked to authenticate to hopx.psi.ch again). This only works if the host name of hopx.psi.ch is specified in the option "-J" exactly as in step no. 1, i.e. hopx.psi.ch
Note:
- Step 1 and step 2 must be carried out separately and must not be combined in a single command!
As long as the setup-connection from step no. 1 to hopx.psi.ch is open, any other SSH connections to the same or other internal systems can be established. For example with
Step no. 3, 4....
$ ssh -J <user>@hopx.psi.ch <user>@ssh-srv2.psi.ch
SSH using "ProxyJump" and simultaneous port forwarding (RDP) via an internal system
The SSH connection to an internal system described above can be extended by one or more port forwarding. A local port is opened on the client system for this purpose. Connections to this port are sent through the SSH tunnel to the internal system and then sent to the actual target system.
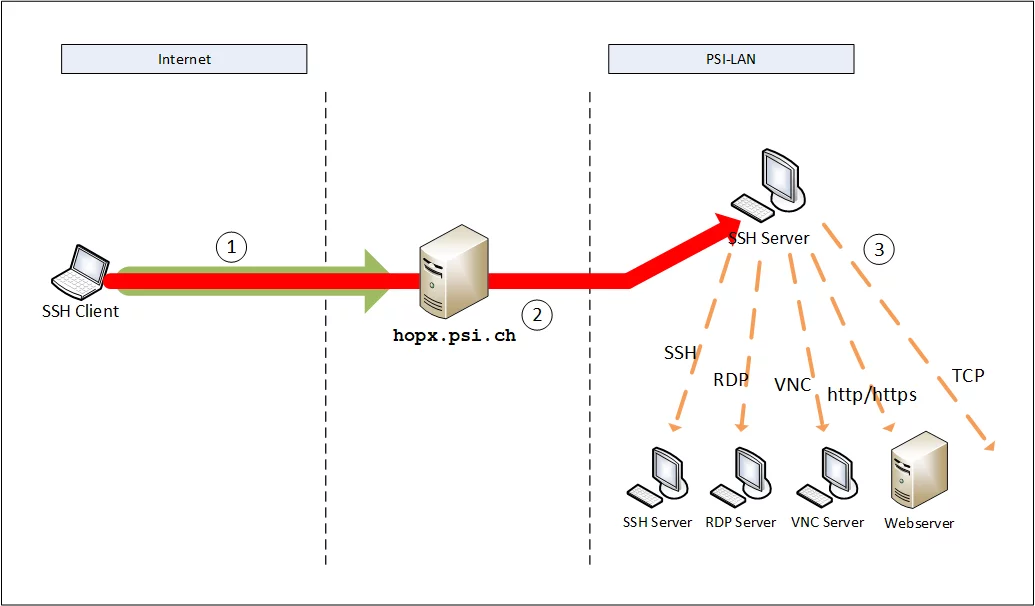
Procedure:
- establish setup-connection (see basics above) to
hopx.psi.ch - establish SSH connection via
hopx.psi.chto the internal system with port forwarding - use of port forwarding
(Note: ssh-srv1.psi.ch, rdp-srv.psi.ch, vnc-srv.psi.ch are not real systems, merely placeholders and serve as examples. These host names must be replaced by the host name of the system you know!)
Example: Step no. 1, establish setup-connection to hopx.psi.ch and leave it open
$ ssh <user>@hopx.psi.ch
Then it is recommended to open a new terminal and start the SSH connection for step no. 2
Example: Step no. 2, establish SSH connection via hopx.psi.ch with port forwarding
$ ssh -L 8888:rdp-srv.psi.ch:3389 -J <user>@hopx.psi.ch <user>@ssh-srv1.psi.ch
With the option "-L 8888:rdp-srv.psi.ch:3389", port 8888 is opened locally on the SSH client system. (without active SSH multiplexing, you will be asked to authenticate again at hopx.psi.ch)
Note:
- Step 1 and step 2 must be carried out separately and must not be combined in a single command!
Example, step no. 3, using port forwarding
Start the RDP client and connect to "localhost:8888" or "127.0.0.1:8888". This will take you to the login prompt of rdp-srv.psi.ch.
If further port forwarding is required, this can be specified during the connection in step 2. The "-L" option can be specified multiple times, e.g:
ssh -L 8888:rdp-srv.psi.ch:3389 -L 5900:vnc-srv.psi.ch:5900 -J <user>@hopx.psi.ch <user>@ssh-srv1.psi.ch
In this example, the local port 5900 is also forwarded to port 5900 of the system vnc-srv.psi.ch.
Activate SSH multiplexing
With SSH multiplexing, SSH connections are sent through existing SSH connections, which is faster and more efficient. When using multiple SSH connections via hopx.psi.ch as a ProxyJump, it is advisable to use SSH multiplexing. The connections are then sent to hopx.psi.ch via the existing setup-connection, making them faster and eliminating the need for additional authentication to hopx.psi.ch without active SSH multiplexing.
SSH multiplexing is activated as follows:
If the file ~/.ssh/config does not yet exist, it must be created.
$ touch ~/.ssh/config$ chmod 600 ~/.ssh/configthen edit the file ~/.ssh/config with any editor and add the following content
$ cat .ssh/config Host *.psi.ch ControlMaster auto ControlPath ~/.ssh/tmp/%h_%p_%rThen the directory for the "ControlPath" must be created (also once)
$ mkdir ~/.ssh/tmp$ chmod 700 ~/.ssh/tmpThe system is now ready to use SSH multiplexing. An existing setup-connection to hopx.psi.ch must be terminated and re-established before using SSH multiplexing for the first time.
Further interesting information about SSH multiplexing can be found here:
https://www.cyberciti.biz/faq/linux-unix-reuse-openssh-connection/
SSH and the use of the "config" file
If you regularly use the same port forwarding and want to establish several SSH connections to different systems in the PSI LAN, using the config file is a considerable simplification and is recommended for so-called "power users".
The file has already been edited to activate SSH multiplexing. It can be found in the .ssh directory in the home directory of the respective user.
Note:
When using the example config file described below, please delete the line
Host *.psi.ch
which was inserted during the activation of SSH multiplexing.
The new content of the config file could then look like this:
(Note: ssh-srv.psi.ch is not a real system, merely a placeholder and serves as an example. This host name must be replaced by the host name of the system you know!)
$ cat ~/.ssh/config ControlMaster auto ControlPath ~/.ssh/tmp/%h_%p_%r ForwardAgent yes ForwardX11 yes ForwardX11Trusted yes host hopx.psi.ch psi-outside-ssh-gw hostname hopx.psi.ch host ssh-srv.psi.ch hostname ssh-srv.psi.ch DynamicForward 9000 LocalForward 8389 rdp-srv.psi.ch:3389 LocalForward 8445 fileserver.psi.ch:445 # for use with macOS match host *.psi.ch !host hop*.psi.ch !exec "ifconfig -a inet | grep -q -E 'inet 129\.129\.'" ProxyJump psi-outside-ssh-gw # for use with Linux #match host *.psi.ch !host hop*.psi.ch !exec "ip -o -4 a | grep -v -E 'lo *inet' | grep -q -E 'inet 129\.129\.'"# ProxyJump psi-outside-ssh-gw
Again, two connections must be established:
- establish SSH connection to hopx.psi.ch and leave it open
- establish SSH connection to ssh-srv.psi.ch and leave it open
With the SSH connection to ssh-srv.psi.ch, three local ports are opened on the SSH client. Port 9000 for "dynamic tunneling", port 8389 to rdp-srv.psi.ch and port 8445 to fileserver.psi.ch
Dynamic tunneling
With dynamic tunneling, hopx.psi.ch or a system in the internal PSI network is used as a Socks5 proxy. This allows, for example, several different internal web servers/websites to be contacted without having to set up a separate tunnel or port forwarding to each one.
To open a port for dynamic tunneling locally on the system, you can specify the command line option "-D" under Unix/Linux/macOS.
Tunneling directly via hopx.psi.ch
$ ssh -D 9000 <user>@hopx.psi.ch
...opens port 9000 locally on the client system. Connections to this port are sent via the SSH connection to hopx.psi.ch and from there to the internal server.
Tunneling via an internal system in the PSI network (note: the separate setup-connection must have been established beforehand!)
(Note: ssh-srv.psi.ch is not a real system, merely a placeholder and serves as an example. This host name must be replaced by the host name of the system you know!)
$ ssh -D 9000 -J <user>@hopx.psi.ch <user>@ssh-srv.psi.ch
...opens the local port 9000 on the client system. Connections to this port are sent through the SSH tunnel to "ssh-srv1.psi.ch" and from there to the internal server.
The "-L" option described above for the port forwarding of RDP connections, e.g. can be used at the same time as the "-D" option. E.G.
$ ssh -D 9000 -L 8888:rdp-srv.psi.ch:3389 -J <user>@hopx.psi.ch <user>@ssh-srv.psi.ch
(In this case, too, a setup-connection to hopx.psi.ch must already exist!)
Use with the SSH config file
If you use the SSH config file, you can also make the corresponding entry with "DynamicForward 9000".
Example, excerpt from the config file
(Note: ssh-srv1.psi.ch is not a real system, merely a placeholder and serves as an example. This host name must be replaced by the host name of the system you know!)
host ssh-srv.psi.ch hostname ssh-srv.psi.ch DynamicForward 9000 LocalForward 8389 rdp-srv.psi.ch:3389 LocalForward 8445 fileserver.psi.ch:445 If the port for dynamic tunneling has been opened on the local client system, it can be used with the browser.
Use of the dynamic tunneling
Once an SSH connection to hopx.psi.ch or a system in the internal PSI network has been established and port 9000 is available locally (see above), it can be used with a browser.
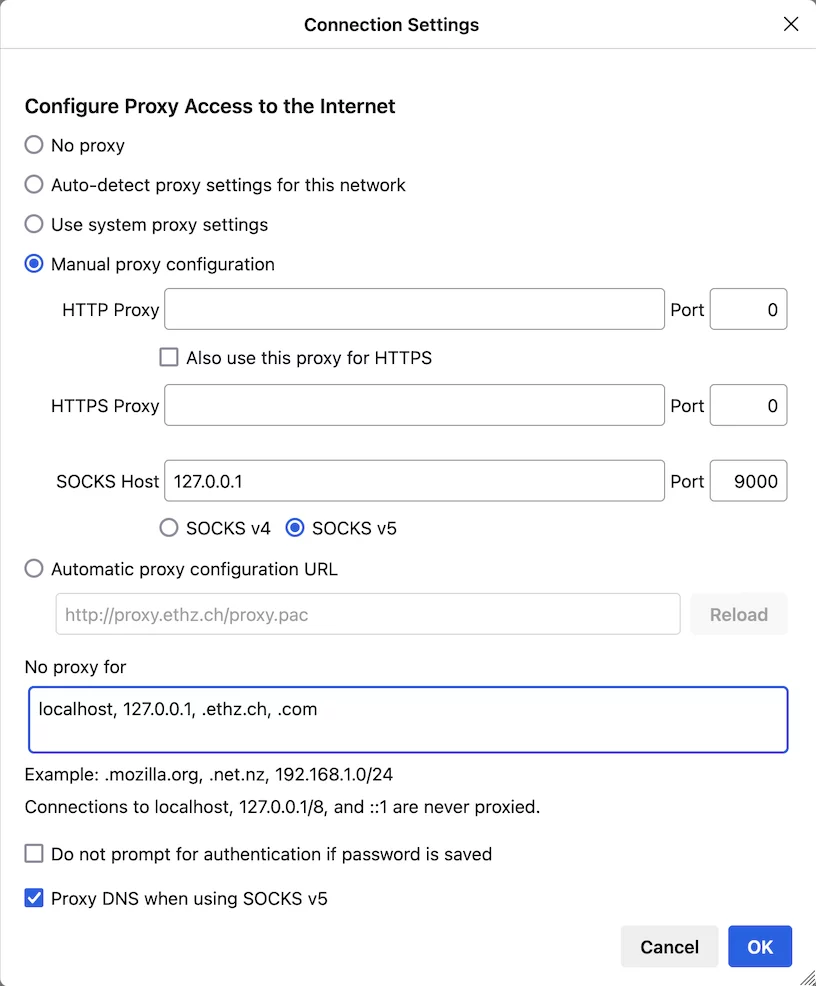
In the proxy settings of the Firefox browser (Settings -> General -> Network) enter at
SOCKS Host: localhost Port: 9000.
Instead of "localhost" you can also enter "127.0.0.1".
In the "No Proxy for:" field, you should also enter all domain/host names, IP addresses/ranges that are to be called up directly, i.e. without the diversions via hopx.psi.ch or the internal system, e.g. "localhost, 127.0.0.1, .ethz.ch, .com" .
The option "Proxy DNS when using SOCKS v5" must be activated with a tick. The settings must be confirmed by clicking on "OK".
Note:
PSI employees can only access PSI internal websites, www.psi.ch and intranet.psi.ch via hopx.psi.ch. Access to ServiceNOW should also work. Other PSI-owned but externally hosted sites can be enabled if required. Connections to non-PSI, external websites will not be forwarded! If you need unrestricted access to PSI's own websites (as if a system is used on site at PSI), we recommend dynamic tunneling via a PSI-internal system in the PSI network and NOT directly via hopx.psi.ch.
Note for macOS-users
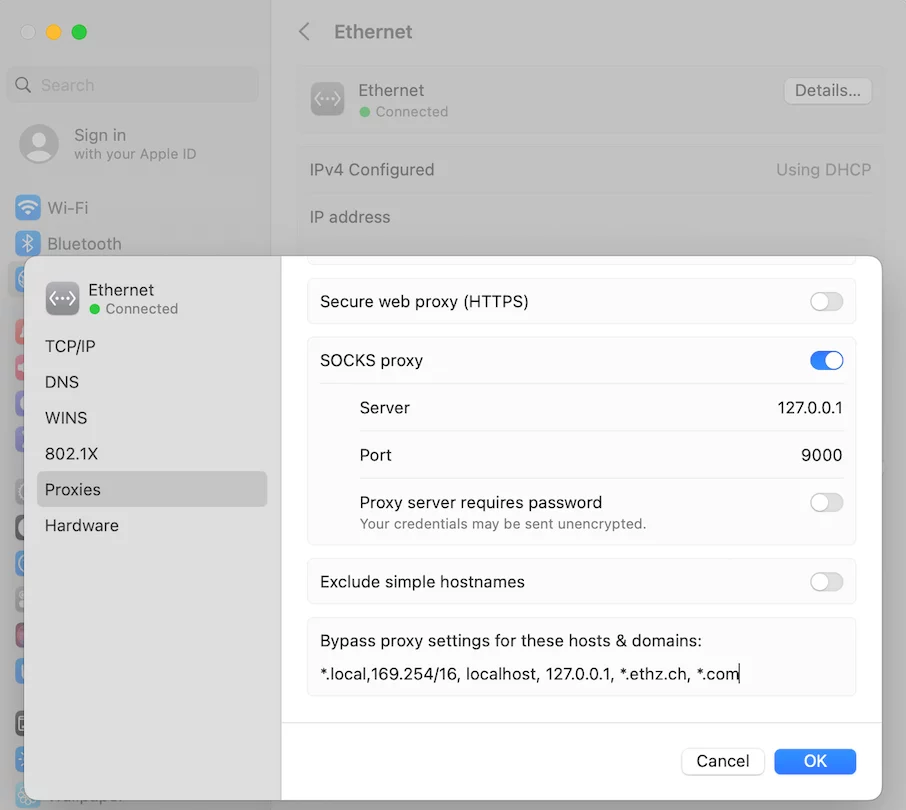
If you want to access internal websites using the Safari browser, you must activate the use of the Socks proxy via the network properties. To do this, go to "System Preferences -> Network -> the network connection used (Ethernet or WiFi) -> Details -> (left) Proxies" and then activate "SOCKS proxy" in the right-hand field. Then enter “127.0.0.1” in the Server field and “9000” in the Port field. The proxy exceptions are entered at the bottom of the list. Then confirm with “OK”.
Attention:
The settings are globally valid for all applications on the Mac system that use the network properties. This also includes, for example, the Mail and Calendar applications. This means that all network connections of these applications are also made via the socks proxy. This then leads to connection problems when servers outside the PSI are contacted. To avoid this, the servers must be excluded from proxy use by making an entry in the “Bypass proxy settings for these hosts & domains:” field.


